

Continuing our Hackintosh guides journey, here we present the Easiest way to create Hackintosh for the Latest OS X iteration: Mountain Lion.
We had been working hard while experimenting different ways by which you could hackintosh a Mountain Lion on a PC. It took us a while, but after testing all possible methodologies, here’s the easiest one for you.

If you’re new to hackintosh world, lets start with a intro: OS X is designed to work with Apple hardware. But this project makes it possible to run Apple’s desktop operating system on a Windows PC and make what’s called a “Hackintosh”
If you already own a Mac/Macbook, follow: how to make bootable USB drive for installation of Mountain Lion, hackintosh is not for you.
Mountain Lion received 3 Million downloads during its first few days of release. But if you’re stuck with a PC, here’s your chance to taste the delicious fruit.
Warning: Hackintosh is never child’s play, and its not for weak hearts either. There’s always a chance of failure, and you should learn to live with it.
Hardware requirements for Mountain Lion Hackintosh:
- 2 GB of RAM and 10 GB of free hard drive space.
- Minimum Intel dual-core processor.
UniBeast is a handy Utility that helps you create a Bootable USB pen drive for easy installation of Mountain Lion OS X 10.8 on PC.
Here’s what you need:
- UniBeast / Multibeast. Download it from Tonymac forums and install to /Applications.
- Access to an operational OS X system. (This can be your friend’s macbook or another hackintoshed system)
- An Original copy of Mountain Lion 10.8 (you can download it rom Mac App Store)
- 8gb USB drive or greater.
- A lot of patience.
How to Install Mountain Lion 10.8 Hackintosh on PC
Step 1: Formatting Bootable USB drive:
Plug your USB drive into to the Mac/Macbook/Hackintosh.
Open Applications > Utilities >Disk Utility and select your USB drive from the left pane. Select the Current drop down menu and choose the 1 Partition option. From there, select Options underneath Partition tab and check mark Master Boot Record option. When done, click Ok.
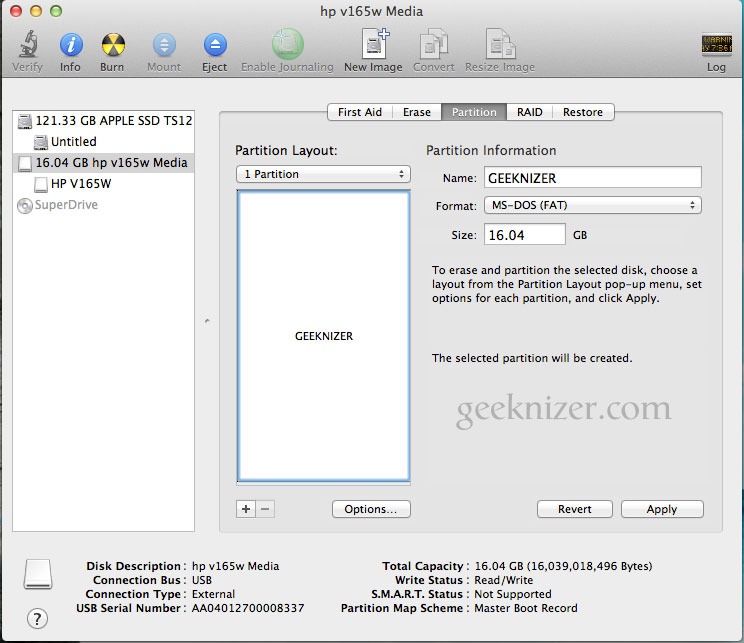

Navigate to the “Format” tab, make sure Mac OS Extended (Journaled) is selected, click Apply and then click Partition.
Step 2. Making USB Bootable Installer with UniBeast app
Run the UniBeast 1.5.1 from /Applications folder. Skip through the first few screens before selecting the relevant USB drive on the Select a Destination screen. Choose Continue, UniBeast will then look for the Mountain Lion installer file in the /Applications folder and start copying it to the USB drive.

When done, your USB is ready with the installer. We will now run through installation.
Step 3. Installing Mountain Lion on PC
i. Prepare BIOS: Now take this Bootable USB and plug to the PC where you wish to install it. Power ON system and hit F12 (or whatever shortcut you’ve for your PC to boot into BIOS) and then Enable boot from USB, and raise its priority to the highest.
ii. Preparing for Installation: After booting from the USB drive, you would see the OS X installer screen. Here, you can choose your language, then from menu bar at top, choose Utilities > Disk Utility.
Select the target hard drive for the installation of Mountain Lion on your PC and click the Partition tab.
iii. Partitioning your HDD: Select 1 Partition then select GUID Partition Table. You can name your hard drive partitio anything you want and set the Format to Mac OS Extended (Journaled). Click Apply then Partition. This will take only few seconds and your partition will be formatted.


iii. Installation: Now you can proceed with isntallation by choosign the Partition you just created. Installation would take more than 30minutes, grab a cup of coffee while you wait for the delicious deserts ahead.
Voila, your Mountain Lion has been installed! Congrats!
On next boot you can reset your BIOS settings, and choose the new Mountain Lion option to boot into OS X Mountain Lion you just installed.
Step 4. Installing Drivers
Post-installation, chances are that if you run the latest hardware, most of your hardware like wirelesss, sound card, etc would work. If it doesn’t its now time to install the required drivers.
Drivers are installed as KEXTs. But this process is automated with MultiBeast tool. Run the MultiBeast tool and checkmark all the relevant hardware for which you wish to install Kext drivers.


If you encounter problems or have questions, feel free to leave them in the comments section below.
We write latest and greatest in Hackintosh, Tech Guides, Apple, iPhone, Tablets, Android, Open Source, Latest in Tech, subscribe to us @geeknizer OR on Facebook Fanpage, Google+