We’re fan of LIVE USB, CDs since they came into being. We’ve showed you how you can Run Windows XP from Live USB, Run ICS on PC, Mac using Live USB.
Running Windows 8 from Live USB can be useful in a number of a ways. It becomes your portable computer, wherever you go.
Here’s what you need to get started:
- A PC running Windows 7 or later
- Windows 8 Consumer Preview ISO (32-bit only)
- The Windows Automated Installation Kit (AIK)
- USB Pen drive / HDD with 32GB or higher
The Full windows 8 installation to USB pen drive would eat around 12GB of space plus your own software applications. Other than that it would need temp and swap storage. You can live with 16gb pen drive but soon you’ll be choked to death.
Step 1. Prepare USB pen drive / HDD.
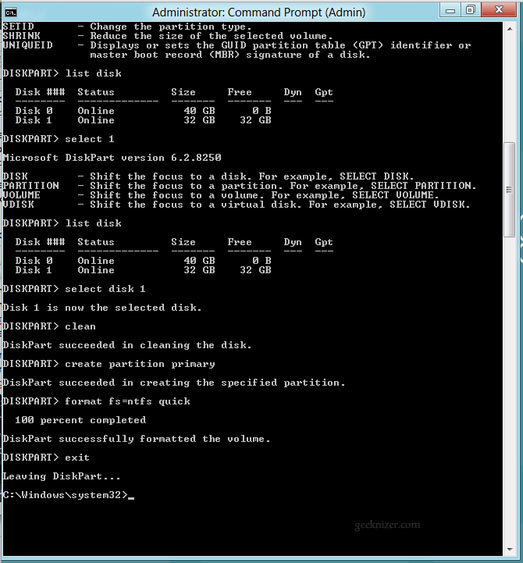
Fire up your command prompt in admin mode and type the following commands:
DISKPART
LIST
Select the USB as active by entering SELECT DISK and its disk number. For example, if the USB drive is listed as disk 2, enter following command:
SELECT DISK 2
Remove all existing partitions from USB pen drive/ hdd.
CLEAN
and create new primary partition
CREATE PARTITION PRIMARY
Quick-format the partition as bootable NTFS:
format fs=ntfs quick
Set the partition as active:
ACTIVE
EXIT
Step 2. Setting up the partition on the USB for Windows to Go
1. Mount ISO image you downloaded for Windows 8 using any application like PowerISO.
2. Browse the mounted ISO, look for install.wim in the \sources directory and copy it to your local hard disk e.g. c:\geek.
3. Install the .NET framework first then install AIK. The kit consists of a set of command-line tools for building and distributing custom Windows images. Using imagex.exe, extract the image from the .WIM file and write it to our USB drive.
4. Copy the version for the architecture of Windows you’re running on your PC (the 32-bit version is at C:\Program Files|Windows AIK\Tools\x86) to the directory we put the install.wim.
5. Go to my computer and check the drive letter which is assigned to USB device. We’ll assume its u:\.
6. In command prompt cd into the directory install.wim and imagex.exe are (i.e. cd c:\geek).
7. Enter the command:
imagex.exe /apply install.wim 1 u:\
bcdboot.exe d:\windows /s u: /f ALL
Step 3. Booting into windows 8 from USB
In BIOS settings, enable USB booting and raise the priority of USB HDD to highest.
On first boot, Windows 8 Live would detect hardware and reboot, and then bring up the screen requesting the product key. Then it would go through some regular installation tasks.
Bootup and generic performance of the OS is not bad at all. Give it a try and let us know how it goes.
We write latest and greatest in DIY, Tech Guides, Apple, iPhone, Tablets, Android, Open Source, Latest in Tech, subscribe to us @geeknizer on Twitter OR on Facebook Fanpage:
loading...
loading...


Hi Tarandeep
Thanks for the above. i am a fan of your posts so keep up the good work.
One small correction on the above (had me stumped for a bit). With the BCDBOOT command line the source path should be the same as the USB drive letter
ie: bcdboot.exe U:windows /s u: /f ALL
Cheers
G.
loading...
loading...
Thanks for this..
Just wondering if its possible to install two live OS (XP & Win8) on a 32GB or 64GB flash drive?
loading...
loading...
FLAWLESS! I extracted the WIM file from a windows 8 ISO 64 bit, and used the current boot files from my windows 7 32 bit. Booted up flawlessly on two different machines.
loading...
loading...
I’m stuck, “extract” does not appear to be an option for imagex.exe (Examples:
IMAGEX /APPEND /?
IMAGEX /APPLY /?
IMAGEX /CAPTURE /?
IMAGEX /DELETE /?
IMAGEX /DIR /?
IMAGEX /EXPORT /?
IMAGEX /INFO /?
IMAGEX /SPLIT /?
IMAGEX /MOUNT /?
IMAGEX /MOUNTRW /?
IMAGEX /REMOUNT /?
IMAGEX /COMMIT /?
IMAGEX /UNMOUNT /?
IMAGEX /CLEANUP /?)
am i doing something wrong?
loading...
loading...
please give me video
and full with tutorial
loading...
loading...