The Apple “iPhone” is a status symbol, and folks get super excited about every new model release. However, you should make the most out of it by using its amazing camera correctly. The camera plays an important role but simply clicking photos randomly would not make them good. It will help if you take care of several things while capturing them. Read these tips to level up the game of iPhone photography.
Follow the KIS rule – keep it simple
The first thing to consider when trying to take an alluring photo is to minimize distractions as much as possible. It will make the focused subject stand out. Remember, the fewer details you capture, the more focused you will be as a viewer. Check the scene beforehand to limit the distracting elements by changing the viewpoint of removing unwanted subjects.
There are several things you could do in adjusting. Two of them are negative space and taking photos from a low angle. Negative space makes the subject stand out.
Most people adapt to taking photos from chest height. It is an excellent way to capture pics, but distractions could be prevented by taking pictures from a lower angle. It comes up with three benefits – a new perspective, the sky in the background, and interesting details in the foreground. Do not be shy about kneeling or lying on the ground; good shots are worth it!
Choose a specific shooting mode
Hold down the camera app to choose from several options, including slo-mo, video, selfie, or regular photo mode. You should go for slo-mo if you want to capture special moments. You will get additional options in the 7 plus and above iPhone models, like portrait mode.
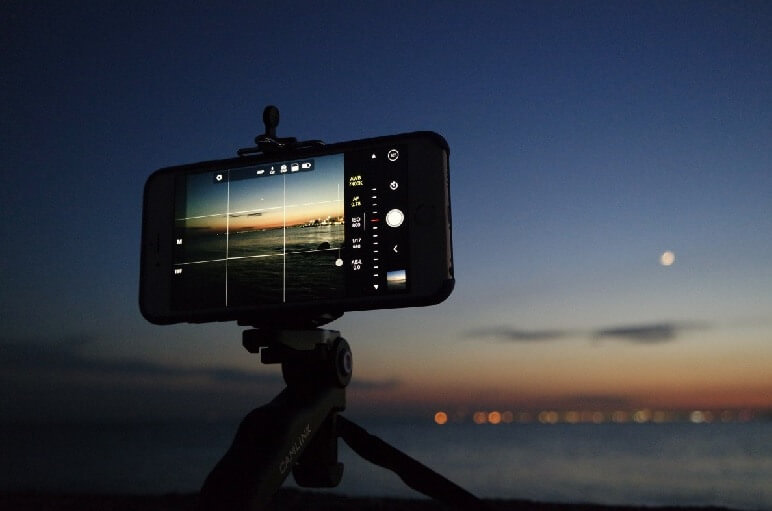
Time-lapse videos also become handy for showing a process in a fast mode. Keep the phone still for better results. The camera will keep capturing photos after mini intervals, and afterward, it will compile them to make a full video.
Timer Button
How many times do you take pictures to come up with a good selfie? The majority will answer, more than ten. Yes, we aren’t joking. Why not set a timer? This functionality is present at the top of the screen. Click the button, and it will take photos after 3 or 10 seconds when you are posed and ready.
The best way is to use a tripod for phones while taking a selfie. You do not have to extend your arm next time for taking selfies. It becomes hectic. Select a proper frame for taking photos beforehand and then keep changing poses for alluring pictures. You can use the self-timer with your tripod, or some models come with remotes to click the shutter from a distance.
Note: The extra space between the camera and your face will yield a more flattering portrait perspective. A selfie stick is also a good option.

Reduce camera shake
It is an essential thing, but it becomes daunting to take pictures without shaky hands. Moreover, the iOS device still struggles at dusk or indoors because of less light. It often takes long exposure to compensate for low light areas, and shaky hands make the scene a bit smeared. Fortunately, iPhone 6 plus and later models have optical image stabilization options.
You could make photos less shaky by placing your back against a vertical support, putting a hand on a table or any low surface, or merely tucking your elbows in your body.
Add a hardware shutter
Capturing a shot from an awkward angle makes the phone shaky. Sometimes, it’s hard to reach the shutter button. Instead, you could use a hardware shutter such as headphones with inline volume controls or an Apple watch as well. These tools allow you to take the photo without hitting the normal shutter button.
Place the phone on a tripod and then take an image by pressing inline volume controls on headphones to help you take photos at desired angles without shaking. Your distance may be restricted because of the wire length. Here, Bluetooth headphones with a good range could be handy.
Another way is to use Apple watch as a remote shutter. It lets you see the exact image your phone is about to capture. Click the white circle on the watch to capture a picture, or even setting a 3-second delay is better. This way, putting your head down while clicking would not be an issue.
Use HDR mode instead of flash
It may help to capture a photo in HDR mode instead of flash in tricky lighting conditions. Instead of putting a light on the scene, it melds several exposures to create a single picture. This mode captures an impressive amount of details and a broad range of tones and colors.
Pro Tip: Scale-up your software game
There are several premium apps available for iOS, which makes the photo way more attractive than the original camera result. These apps help you to edit photos. Many images have issues related to sharpness, saturation, exposure, and more. Such apps fix all these issues through special filters and make pictures much clearer than original ones.
We hope that now you will be able to capture stunning pics from your iPhone by following the tactics mentioned above.
loading...
loading...